Every successful organization adopts a sales process that is best suited to meet its business goal of revenue generation. From generating leads to converting them to paying customers, D365 for Finance and operations is flexible and highly capable of facilitating simple to complex sales processes.
This is a three-part series blog that details out how to use D365 Finance and Operations to effectively manage the entire cycle of the sales process.
Let us look at how D365 F&O can be used effectively to manage the sales process of a company.
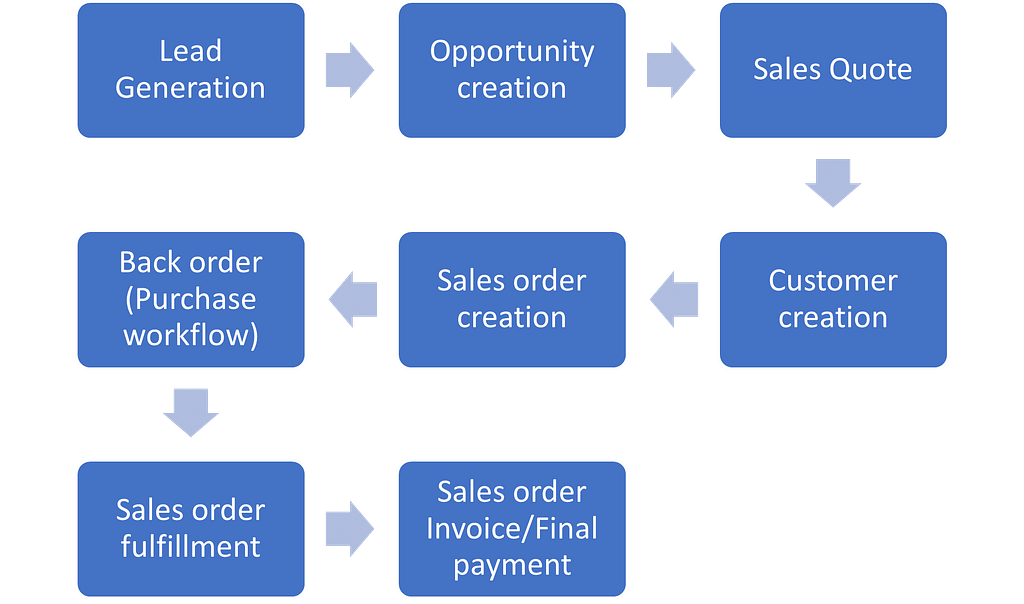
Alpine systems Ltd sells car audio and other digital entertainment products. The diagram below describes the sales cycle at Alpine systems.
Quick recap
So far we have learnt how to convert a lead to a customer, raise a sales quote and convert the sales quote to a sales order. In this blog, we will learn how to create a purchase order from the sales order and update inventory by making a new purchase. We will also fulfill the order and make the final payment towards the transaction.
Arnie, the salesclerk at Alpine systems checks the inventory and finds that the product is not in stock. He then raises a purchase order from the sales order.
Alpine systems has an automated purchase order process. Purchase orders require approval before the products are received and the orders are invoiced.
Sonya is the Buying agent at Alpine and is responsible for entering the right details such as the vendor, item and the purchase price on the purchase orders. She then submits these purchase orders to the Purchasing manager for approval.
Greg is the Purchasing manager at Alpine systems. He is responsible for reviewing purchase orders that are assigned to him and approving them. On approval, the purchase orders are directed back to Sonya the buying agent. She then posts the product receipt for the items purchased and invoices the purchase orders.
When the stock is updated, Debbie, the Accounts receivable clerk fulfills the order and invoices it. She then settles the remaining amount against the invoice.
Create Purchase order from the sales order
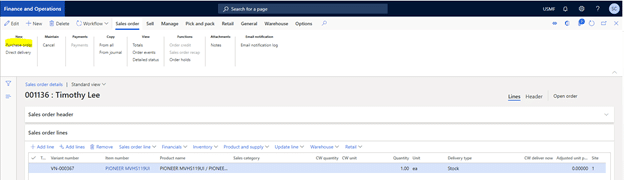
To raise a purchase order from a sales order, click on Sales order> New> Purchase order in the action pane within the sale order form.
Select the Vendor account, site and warehouse, quantity to be purchased and the purchase unit price and then click Ok.
A purchase order will be automatically created which can then be processed.
Submitting a Purchase order for approval
To submit a purchase order for approval, click on Workflow> Submit.
Enter a suitable description before you click on Submit.
Approving Purchase orders
Once you have reviewed the purchase order and are ready to approve it, click on Workflow> Approve. If you need changes to be made on the purchase order and want to reject it, click on Workflow> Reject. On rejecting the purchase order, the order will be sent back to the Buying agent for any changes to be made.
Enter an appropriate comment before approving the Purchase order.
Post Product receipt and Purchase order invoice
Once the Purchase order is approved, it can be confirmed. Confirm the purchase order by clicking on Purchase> Actions> Confirm. You can then post a product receipt for the items you have received.
To post a product receipt, click Receive> Generate> Product receipt. Enter the product receipt number and then click Ok.
On posting the product receipt, your on-hand inventory gets updated. You can check the On-hand inventory by clicking on Inventory> View> On-hand.
The Purchase order can then be invoiced. To invoice the purchase order, click on Invoice> Generate> Invoice.
Enter an Invoice number and click Post to post the invoice.
Sales Order fulfilment
Once you have adequate stock of the product in the inventory, you can fulfill the sales order and invoice it.
You post the packing slip as part of the fulfilment before invoice. To generate the packing slip for the sales order, click on Pick and pack> Generate> Post packing slip. In the Parameters section, select All under Quantity and then click Ok.
Now that the sales order fulfilment is complete, you can go ahead and invoice the Sales order. To invoice the sales order, click on Invoice> Generate> Invoice.
Check all details on the invoice before you click on Ok to post the invoice.
Final settlement
Once the invoice is posted, all that is left to do is the final payment towards the invoice. Since a deposit amount was collected at the time of creating the sales order, the remainder of the total invoice amount needs to be settled.
To settle the invoice click on Accounts receivable> Payments> Customer payment journal. Add a new line and select the Customer journal name and then click on Lines
Click New and select the customer Account and then click on
Settle transactions
Mark the transactions to settle and click Ok.
Enter the Offset account and Method of payment and click Post to post the payment.
This brings us to the end of the Order to Invoice cycle.